Showing posts with label gifts. Show all posts

Tuesday, 23 April 2013

Pretty in a pinny - part 2

I've had another request for my sewing 'talents'.  Do you remember this post about the apron I made for my MIL? 

The original pinny
Well, she's requested an improvement to it.  She's quite petite, so to be honest, a pinny to cover just her skirt isn't all that practical.  So my new 'commission' is to add a 'bib' to it.

Thankfully I've enough of the original fabric left that it was a fairly quick task.  I thought about repeating the frill on the bib somewhere, but decided it would be a bit OTT.  I opted for KISS instead (kept it simple, stupid - for anyone who's unsure) and just added a square-ish 'bib' in the same fabric as the body of the original apron and used the contrasting fabric (like the frill) to make a neck band/tie.  But I thought that was a bit unimaginative and it is quite a feminine apron and fabric.

Then, whilst doing something completely different, I came across Amy Butler's apron pattern and thought a version of the 'bib' part might work quite nicely (and DH agreed).  So in true 'Great British Sewing Bee' fashion, I draped and pinned and tucked and repinned .... until I came up with something vaguely like I wanted.  Just to be sure (as I'm not all that experienced in draping etc) I cut out the lining first from one of DH's old shirts and redid the draping, pinning thing again.  And once I was happy with that, I cut a matching piece out of the 'paisley' fabric and edged the curved 'neckline' with the fine print (as above) and also added edging along the sides that become the ties around the back of the neck.  I just hope it doesn't look too 'added on'.
A rather tired and mad looking 'yours truly' modelling
the new look apron after a long choir rehearsal

Thursday, 4 April 2013

Spring headbands

We've just had a lovely Easter weekend with my PIL and DH's family.  It was a bit of a shame that the weather is STILL nothing like spring, but at least we saw some sunshine.

Our little DNc and DNw were there too, charming us all and providing fabulous entertainment all weekend. But two and half year-old DNc's hair, like most toddler's hair, is fine and fly-away and now that it is a bit longer, was constantly in her eyes and her alice bands and clips just weren't staying put.  So after we got home, out came my stash of ribbons and SIL chose a few she liked and whilst I was watching Broadchurch on Easter Monday

I made some elasticated headbands for DNc.  I hope they'll fit.

Here is the method (which is more or less what I'd thought up myself but simpler and actually thanks to a Martha Stewart video I found online).
Materials (essential):
ribbon
elastic
needle
cotton/thread
scissors
tape measure
(optional)
buttons, bows, charms, beads, other embellishments
  1. Measure your head (roughly where you'd wear a headband).  I usually work in centimetres, but this time I worked in inches just because it was a nice round figure.  So, my example was 20 inches.
  2. Deduct a small amount, in my case I deducted 2 inches, to allow for a bit of give so the band will 'grip'.
  3. Deduct another small amount - this is to split the measurement between the ribbon and the elastic.  I went for 15 inches and 3 inches, which will give me an 18 inch headband to fit a 20 inch head.
  4. I cut my ribbon to 16 inches (to allow a generous half inch at either end to neaten the ends) and 3.5 inches of elastic. 
  5. Turn up approximately 0.5 inch at one end of your ribbon.  Centre one end of the elastic on it, so that it looks a bit like this ....
  6. Stitch elastic to ribbon to secure in place.  Fold sides of ribbon over and sew ribbon edges together, so it looks a bit like this .....
  7. Repeat steps 5 and 6 with the other ends of the ribbon and elastic (take care to ensure that neither the elastic nor the ribbon has twists in it)
  8. (optional step) add embellishments, such as bow, rosette, button ....
  9. Et voila, a pretty, cheap, easy and unique headband for yourself, a friend or a child.  And as Martha says in her video, it is a nice project to do in company and chat whilst doing it (although DH and Broadchurch were my 'company', the conversation wasn't flowing all that much).

Monday, 25 February 2013

Commission update

Take a look at how I'm getting on with my latest commissions with my weekly progress photos.

Dn's bus - week 1

DN's bus - week 2

DN's bus - weeks 3 & 4

DN's bus - weeks 5 & 6
Getting there now

Tuesday, 19 February 2013

Year of the ... bunny

Trying to think of a headline for this post that had something to do with being happy, babies and rabbits was a bit difficult!  First of all I thought 'jumping for joy', but rabbits hop and 'hopping mad' didn't sound appropriate somehow!  And 'hopping for joy' just sounded silly.  And anything to do with breeding and rabbits was a bit crude!  So, following a (very crowded) visit to Chinatown over the weekend to experience the Chinese New Year celebrations I decided to use that idea as my heading.
Anyway, to get to the point, although it is now the Year of the Snake, for a number of our friends 2013 seems to be the year to start their families.  So, I've been stitching cards again and have found a rather cute rabbit motif to use (which is a lot nicer than stitching a snake!).  I rather liked the little chick I stitched for our other friends' baby but decided against using it this time for the birth of our friends' little girl.
Then another couple we know have had twins (a boy and a girl), so I reversed the colours and stitched two, side by side, one in each colour (although normally I don't favour blue for a boy, pink for a girl - I'm all for equality and bought my eldest DN a pink babygro when he was born - much to my BIL's chagrin!!).

So, we're hopping for joy for the new additions to our friends' families - even if it does sound a little odd!

Monday, 4 February 2013

Pay it forward 2013

Since the New Year I've noticed quite a few posts on Facebook about this. If you haven't come across them, they say something like this:
Pay it forward 2013!
I promise to make something handmade for the first five people who comment.  They must in turn post this and make somthing for the first five who comment on their status.
* The rules are it has to be made by you, and they must receive it before 2013 ends.

Initially I thought, I've more than enough to do as it is and I don't want to feel under pressure to make stuff.  But the more of these posts I saw, the more I thought about it.  And as I've been merrily stitching some little objects recently, I've realised that they don't necessarily have to be huge undertakings (and you'll more than likely have to consider postage for them too).  So, as a 'crafty' person, I've been persuaded to give it a go after all and posted my message on my FB page last week.  I've had a few takers - one for a charity my friend supports - and I've already a fair idea of what I'm going to make those who've shown an interest.

I suppose, now it will just be a matter of getting on with it (although, I do have best part of 11 months to give them to my friends!).

Wednesday, 30 January 2013

The key to it all

One of my aims this year is to finally do something with some of the supplies I've bought (no prizes for guessing where!) after having some 'bright idea' about making stuff to sell for charity or something and have ended up just storing for years on end.
Lavender pot
The stash!
Well, amongst this stash are some plastic key rings (and there are some fridge magnets here too).  I can't recall now what I was hoping to raise money for - probably something to do with my church - but they have remained untouched more or less since I got them!
Well, now the time has come to change all that and I've been looking for small enough motifs to stitch on them and wondered what on earth I could depict on them. Thankfully this month's Cross Stitcher has come to the rescue with a booklet of small designs for self-cover buttons, but I'm sure they'll look just as good on a key-ring.
Cardiff Blues keyring
However, it was obvious really. What are key rings for?  For keys of course, so why on earth I didn't think of making them into labels for keys, I've no idea.  So, with a bit of luck, I'll soon have some handy little tabs with cute and practical clues to what the keys are for ... front door, back door, shed, garage, car, cellar, bike, suitcase ... and goodness knows what else I'll think of!
DH also suggested that I make something for his dad, and I'd been wondering what I could make since I made things for most of the family for Christmas.  He's a big rugby fan, so DH sugggested something to do with his favourite team, the Cardiff Blues.  I must admit, I'm quite proud of how it has turned out considering the size and anything curved on a grid of squares is a bit of a nightmare.  I just hope I won't get into trouble for any breach of copyright!!

Friday, 25 January 2013

Valentine or Dwynwen?

I hadn't planned to be making cards this month, but as I was pottering the other day I came across some little motifs that I fancied trying out.  Then, following a conversation with DH I decided that instead of buying him a card for the Welsh equivalent of Valentine's day, St Dwynwen's day on 25th January, I'd make him one.

Somehow we've got into the habit of me giving him a card on Dwynwen's day and him giving me a card on Valentine's day.  And when I was teaching Welsh culture etc at the London Welsh School, the kids and I made some cards for Dwynwen's day after learning her story.  They thought it was great that I was making a card for DH!!  So, now that I'm a craft blogger I'm going to try and make him a card every year now.

2013
2012
 While I was stitching away, we received some lovely news about Spanish friends who came to visit us in the autumn.  Their little boy was born at the beginning of the month, so to congratulate them, I've decided to make them a card too (but obviously not a Dwynwen/Valentine one!!).

In fact, I've been enjoying making such quick 'makes', I may start to make more so that we have a stock ready for use.

Friday, 11 January 2013

New commissions

Having got some Christmas stitching out of my system, it is now time to settle down to some serious stitching (and that doesn't include completing my curtain marathon!).

Over the Christmas holiday I got two new commissions - Yippee! 

The first is for a picture for my DN's bedroom - he's only 10 months old, so it is in the cute and cuddly vein.  His sister was given one by a friend when she was born, but as often happens with second/third ... children, he hasn't had one, so my SIL asked if I'd make him one.  He is such a sweetheart, I could hardly refuse, could I?

So, we've chosen a good old London Routemaster bus (for a good young London lad) full of cute little animals.  He's mad about vehicles already and has a similar print in his room and was given a lovely wooden London black cab for Christmas, so this should be perfect.  I must admit that I'm cheating a little but using a kit I found online here, but despite being fairly creative, drawing isn't exactly my strong point!

And my BIL (different side of the family!) has also asked me to stitch a poem for a friend to commemorate an award she received last summer.  The poem was written especially for the occasion and her name means 'snowdrop' in Welsh, and after a bit of hunting, I've found a nice Art Nouveau snowdrop border to go with it.  With a bit of luck mine will be flowering in the back garden as I stitch!  All I need now is to find a nice Art Nouveau font for the poem and I'll be ready to go.

I'll try to add some 'progress' photos (and of the snowdrops in the garden) here as I go along for you to keep an eye on things.

But for now, it's curtains for me if I don't get on with ours!!!
Week 1 progress
Week 2 progress - it is beginning to look like the back end of a bus!

Weeks 3 & 4 - almost half way there

Friday, 4 January 2013

Light relief

A couple of weeks ago I spent most of an afternoon and early evening crawling on the living room floor between layers of the curtain I'm sewing for the living room.  The cats were quite perplexed and thought it best to steer clear!

So, as a bit of light relief from that and the Christmas madness, I've been making some Christmas decorations.

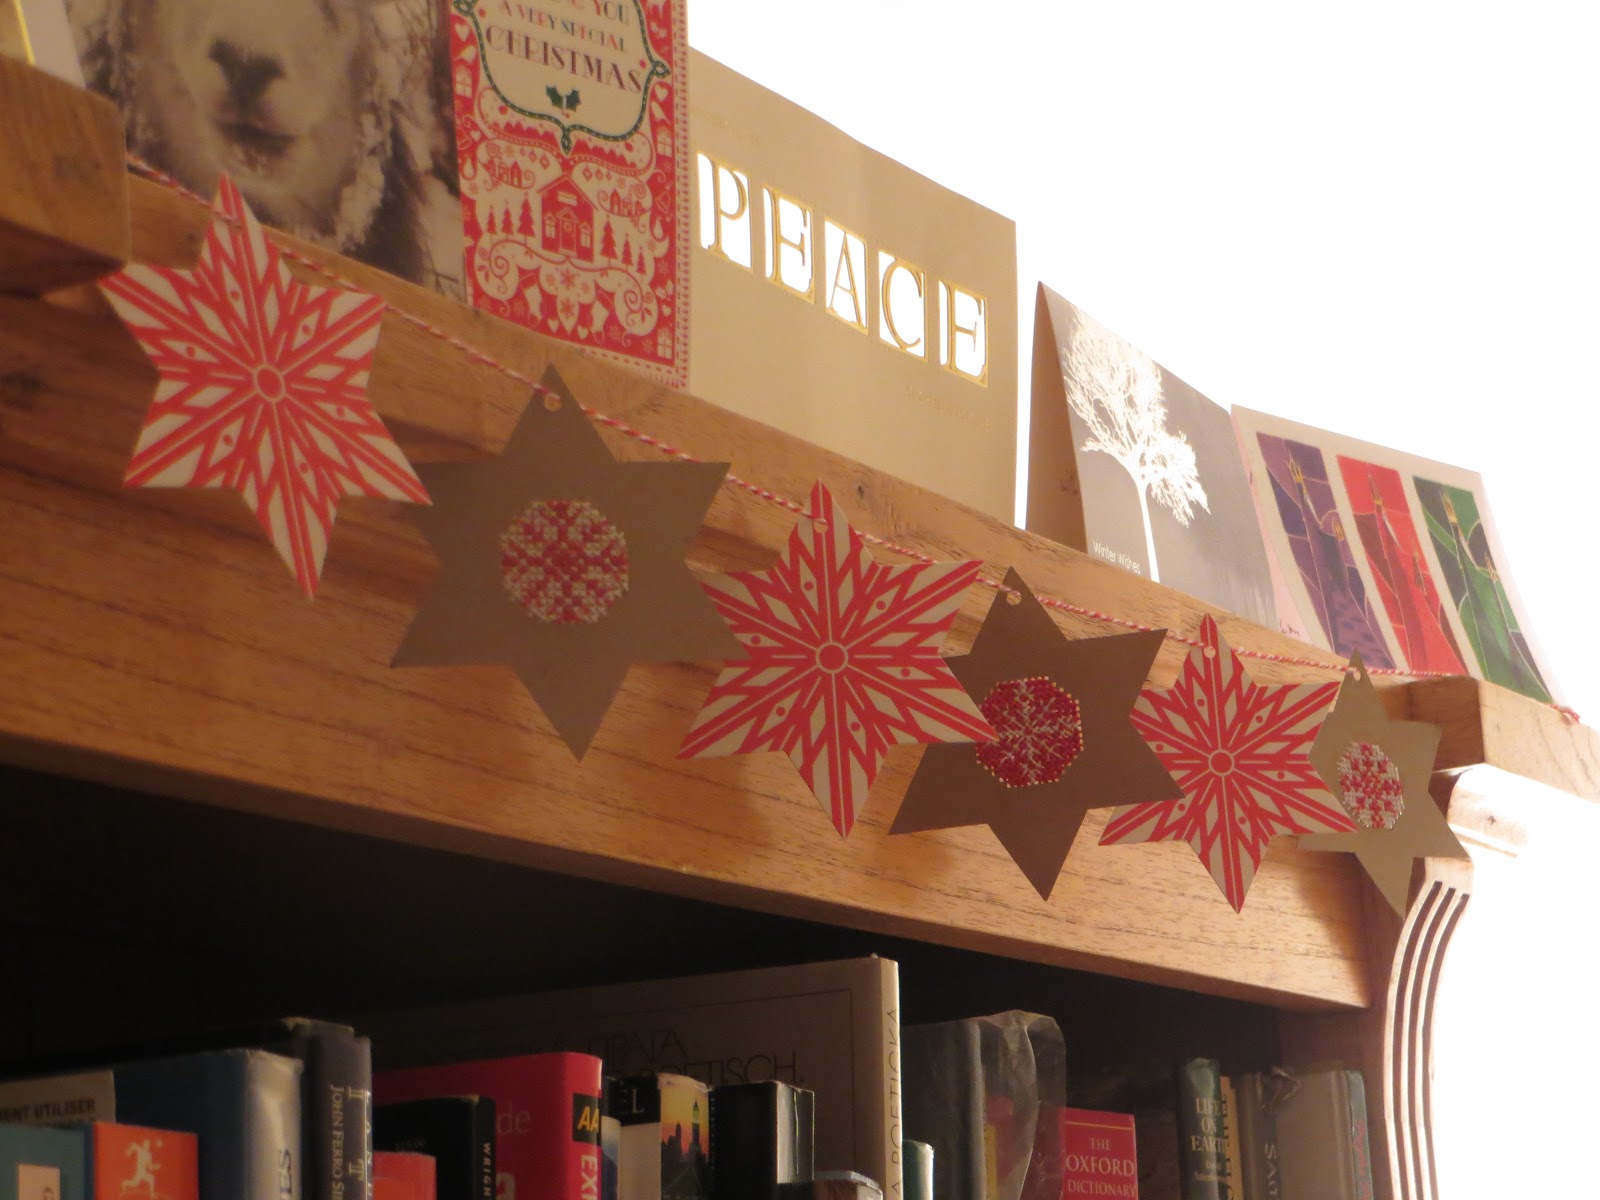
I rather like the magazine, Cross Stitcher, and although there are lots of designs I'm sure I'll never make, there are quite a few that I find quite tempting.  November's issue had a free gift - the materials to make a garland of stars/snowflakes.  In the pack were three red and white patterened card stars and three perforated card stars ready to embroider, red and white embroidery silks, red and white cord for stringing it all together and a needle.  According to the instructions, each star should take two hours to make, but I think I managed each one in a little over an hour.

Initially I intended to decorate our dresser with greenery, but as I didn't think I'd have the time to make a traditional garland, these seemed to be the perfect substitute.  However, I found some fairy lights for the dresser, so I've found somewhere else to hang these now.  They're very pretty and I really like the perforated card stars - although I tend to roll fabric around my fingers as I stitch so I had to be careful not to bend the card too much!  Unfortunately it doesn't seem possible to buy more of the perforated stars, but I've found instructions how to make your own. What do you think?


I'm so pleased with them I think I may try more of their Christmas designs.  I've gone back through old issues and found the free gifts and spent my quiet time over the Christmas break making them.  My DH is a bit confused why I'm making Christmas decorations when we'll be taking the tree down soon, but I'm enjoying myself. 
There are also some pretty Scandinavian inspired decorations in the December issue that may well fit some of the Framecraft accessories I've had from years (yes, more Ebay purchases!).

Wednesday, 2 January 2013

Christmas gifts

Well, for my first post of 2013, I can finally reveal what I made as presents for my family.

Pretty in a pinny! MIL's feminine confection.
His 'n' Hers
Big sis and BIL modelling the blue versions - the red ones were for my other BIL and SIL

Monday, 19 November 2012

The holidays are coming ...

Not that I usually quote adverts, but ...

Anyway, I've had rather a productive few days preparing for Christmas and thought I'd shout about it a bit.

I spent my birthday last week and some of the weekend happily sewing presents for various members of the family.  I promise to post some photos of them soon, but just in case any of them read this, I don't want to spoil the surprise.  Although I could be tempted to post some cryptic shots so as not to disappoint the rest of you - so watch this space!


So, along with some shopping DH and I did at an eisteddfod over the summer, we have 7 presents sorted and 'only' 5 family members to go (and we've a few ideas for some of those) and nearly all of DH's god-children's and our foreign friends' presents have been bought too.  So that is the bulk of the Holiday Headache cleared.

And to add to the festive excitement, a robin decided to visit my DS's kitchen last week and wasn't keen on leaving before they all left for school/work!

Don't you think that deserves a glass of mulled wine?!

Monday, 17 September 2012

The world is your ... embroidery kit?!

Don't you just love holidays?  Travel is one of the many things DH and I have in common.  He's done a lot more of it than I have, but we both love it.  We've both lived abroad too and would love to give that another shot sometime before we're too old.

Over the years we've both collected lovely souvenirs from our travels and our home is decorated with many of them.  I must admit that DH has a very good principal when it comes to buying presents and souvenirs - get something that someone can use or need/want, rather than just buying for the sake of buying and the item collecting dust in a cupboard somewhere.

Since being together we've bought a beautiful rug (India), a St Bridget cross and butter dishes (Ireland), garden lantern (Wales) and a Benjamin Franklin quote print (Philadelphia). We also have Chinese script, south American textiles, African masks, Aboriginal artwork, Czech prints and a few Christmas tree and Easter decorations from our various solo trips.  We do tend to buy a tea towel or two while we're at it too and in our collection there are some from South Africa, Ireland, Belgium, Sweden, Brittany, the London 2012 Olympic Games and Australia.

I love to try to buy embroidery magazines while I'm abroad too, as they are often slightly different to what you'll find here.  But my ideal souvenir is to find an embroidery kit that shows something typical of the country I'm visiting.  It isn't always easy though, but I have managed to get a lovely May Pole from Bavaria, a banner of typical/well known Norwegian buildings, a Swedish Christmas banner, a map of Brittany and some Quimper faience pattern 'samplers' and I also have a provencal table cloth from a visit to my cousin when she lived in Toulon.
Bavarian may-pole - when I replace my camera I'll add a better photo!

Map of Brittany by Philomène

Greetings from Norway - typical buildings


Provencal table cloth and napkins
We were fortunate enough to be in New York for a week when the Icelandic volcano struck and caused havoc with international travel.  What hardship to 'have' to stay there for an extra week!  During the second week I discovered a lovely little embroidery shop around the corner from where we were staying and I went to see what I could find.  I discovered an embroidery 'designer' called Prairie Schooler which has a lot of folk-art style designs.  In the bargain bucket I found "A Prairie Year II" booklet - 12 designs, one for each month of the year - which I thought would be quite practical for a pretty, quick stitch as a card or small gift.

Before leaving NYC, I showed the booklet to our hostess and asked whether she'd like one of the designs and promised to send it to her once I'd finished (with the caveat that I'd no idea how quickly I would manage it!).

It is just as well really, as I saw her again a fornight ago - for the second time over here since our visit there in 2010 - and realised that I still hadn't finished her design.  Well, to be honest, I finished embroidering it ages ago, but haven't made it up into anything yet.  I'd also embroidered another two designs, one for Christmas (but that hasn't turned out as successfully as the other two as the background fabric is a bit pale) and one with a beehive design for another couple we know who keep bees.  I've filled them both with dried lavender so they not only look pretty, but they also smell heavenly. 
Prairie Schooler lavender bags

Yet another UFO to tick off my long list.  How do you think they turned out?

Wednesday, 5 September 2012

Peas in a pod

Oh goodness, I'm not very good at this posting lark, am I?  My apologies for my absence over the last few weeks.  To be honest, I was on holiday for two weeks (and busily embroidering for you instead).

Well, I have finally finished the sampler for my friend's little girl (mind you, at the rate I'm going, she'll be married before I've ironed and posted it to her!).  So she and her brother will now have 'matching' samplers.

I embroidered the 'brother sampler' shortly after he was born:
And have adapted the design to suit a girl, as you can see, by changing the colours and some of the toys depicted.  My remit included her favourite colour (purple) and that she's a horse fan, so I've done my best to include those requests.
There were a few dilemmas as I progressed, including the colour of the alphabet around the edge (it started out green!), were the 'little ladies' in the centre too pale, and most crucially, which letters of the alphabet should I put on the blocks!?!  Actually, it isn't as daft as it sounds really.  As you will see from the 'brother sampler', they have A, B and C on them, but as his name starts with G, that was easy (see the individual block on the right).  But with her name starting with B, I thought the 'sister sampler' would be a bit repetetive if there were two blocks with B on them.  Instead I opted for the end of the Welsh alphabet (which follows the original design by Brenda Keyes anyway).  I also thought of putting a B on the horse's saddle, but decided against it in the end.
Please post your comments on the two samplers - I'd love to hear what you all think!

Tuesday, 1 May 2012

They're changing guards at Buckingham Palace...

Do you recognise the quote?  It is from "When we were very young" by A.A. Milne.  One of my Mam's favourites and quite appropriate because this post is about her brother who was a guard at Buckingham Palace and will be celebrated his 70th birthday recently.
So in honour of all of that, I'm stitched him a special birthday card.  Unfortunately it was too small to put the correct number and pattern of buttons for a Welsh guard, but I hope he'll forgive that small detail (in all senses of the words).
It was quite cute - eventhough I say so myself - and I added a '70' (one digit either side of the poor guardsman's head) in my own font.  I had a few aperture cards left from ages ago and a small red one suited it perfectly.  What a shame I forgot to photograph it in my rush to get to the post, but he was like one of these soldiers.

Friday, 13 April 2012

Trial and error

Well, after talking about it for ages, I'm finally getting down to lining the box for my mother in law.  It is here birthday next weekend, so it is now or never.

Phase one went really well.  I cut a circle of velvet larger than the padded base I'd made and used the sewing machine to stitch gathering stitches around the edge.  Then I gently pulled them to gather the edge so that it would fit around the padded card base.  And it looks lovely!  I'm really pleased with the choice of colour for the velvet and the feel of it is gorgeous.

Next step is the sides.  Now, the first attempt at this didn't go too well - the card was too short and when I tried to roll it to fit the inside of the box, it bent!  So, this morning I cut another length and clamped it to the outer edge of the lid of the box to curve it and left it while I got on with phase one.  So far so good.  I then cut a length of velvet about twice the width and a little longer than the card strip.  Then panic set in.  I thought the velvet was too short for the card!  Anyway, I was wrong.  I sewed the short ends of the velvet together to create a tube.  The next bit was a fiddle.  Trying to wrap the velvet tube around the card was difficult - it either slipped off or bent the card.  Again, with the help of some clamping I got there and on the reverse I pulled the edges together to get it as smooth as possible.

Now came the test.  Could I get the velvet covered tube inside the box and then fit the base in after?  It wasn't easy and at times I thought the tube was too big and I'd have to start again, but I got there in the end.  It isn't perfect and the velvet isn't quite as smooth and snug as I'd hoped, but it doesn't look too bad really.

The velvet lined box after phases 1 and 2

My only concern now is whether, with the added thickness of the velvet, I have enough space to make the  tray insert I'd planned.  While I think about it, I'd better hoover up all the velvet 'fluff' that is all over the floor and my clothes!