Showing posts with label Christmas. Show all posts

Tuesday, 5 January 2016

Merlin has new friends


You've probably noticed over the years, that I quite like making Christmas decorations.  It may also have come to your attention that I buy sewing/embroidery/craft magazines that often have free gifts or kits.

So in true Sew and Siw fashion, I bought a Christmas craft magazine with a free kit a couple of months ago.  And again, in true Sew and Siw fashion, I waited until the Christmas holidays to get the kit out and craft!

I'm probably 'officially' too old for finger puppets, but you're only as old as you feel aren't you?!?  ;-)

PS:  Merlin is our cat in the background - I don't think he's all that impressed with 'his' new friends though!  After all, they take the limelight from him ;-)

Tuesday, 28 January 2014

All that glitters ...

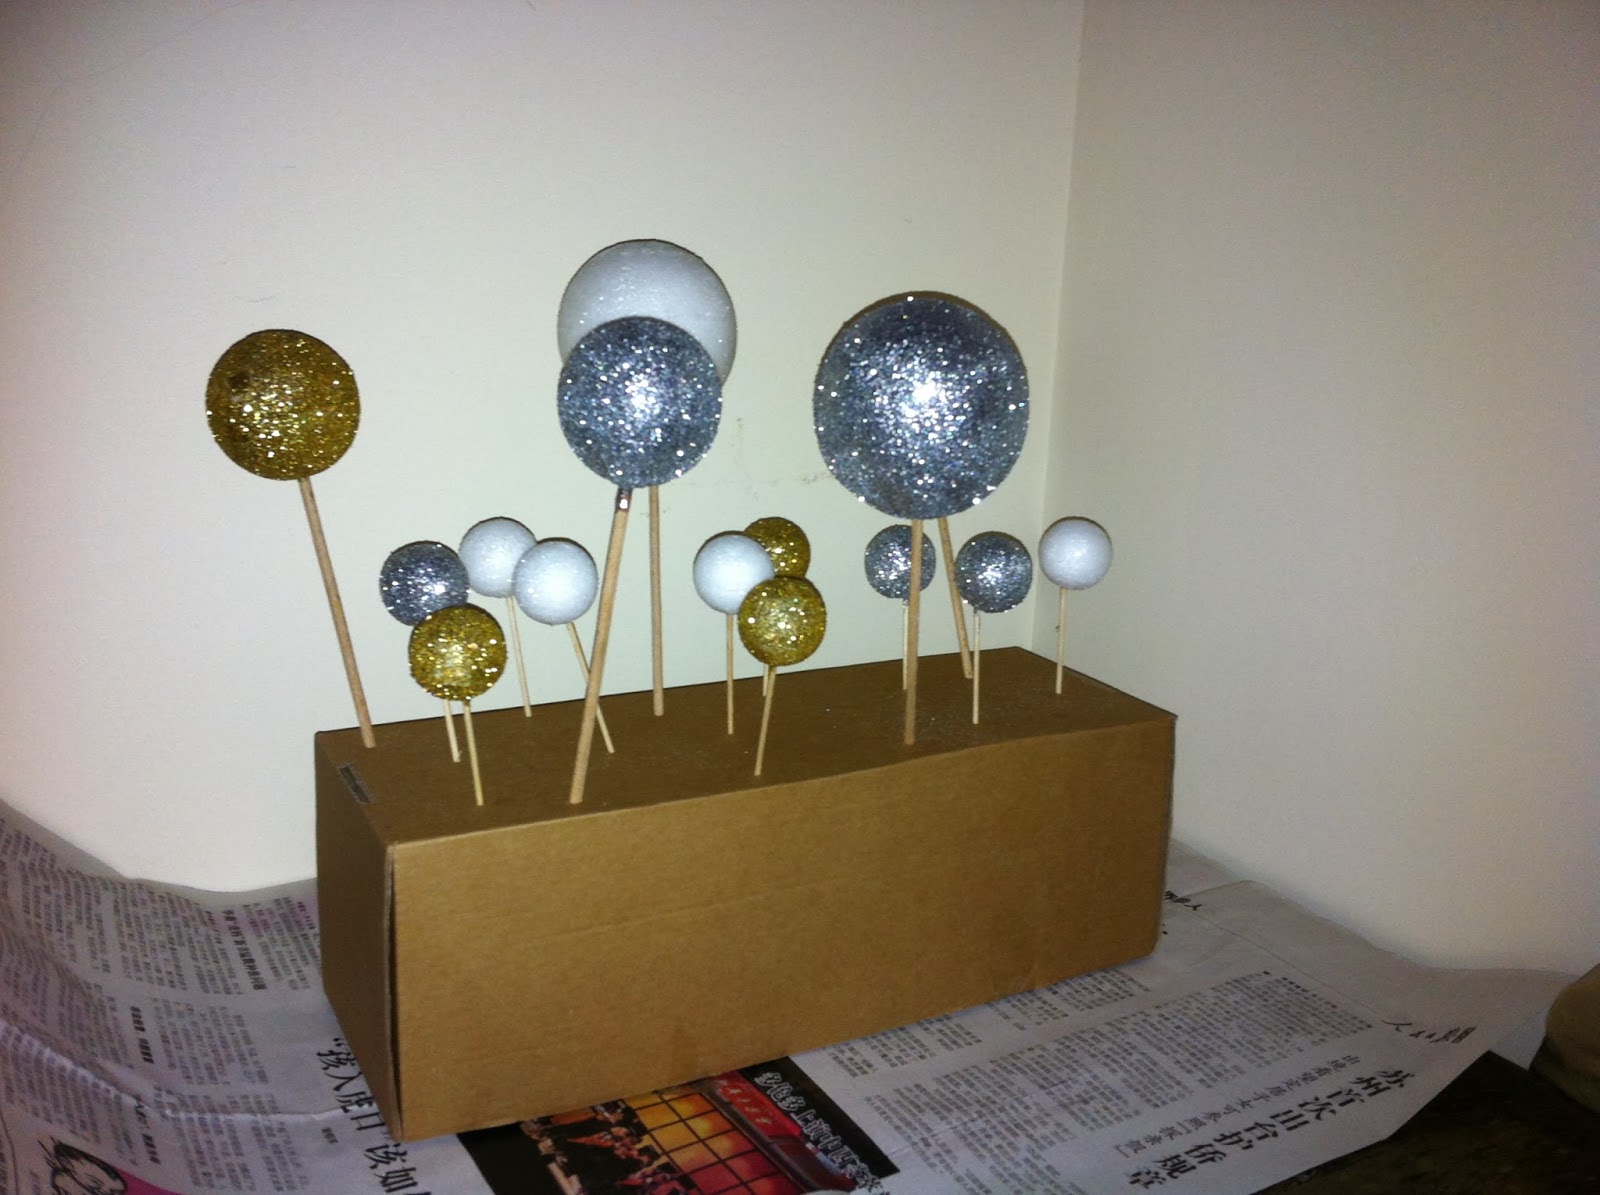
In a recent (exciting) post about odd jobs, I also mentioned giving myself a treat by making some Christmas decorations out of some supplies I'd had lying around for ages and ages.

They were inspired by seeing an episode of Kirsty's Crafty Christmas and are really quite quick and easy to make.  All you need is:
Polystyrene balls
pva glue
brush
wooden skewers and/or cocktail sticks (depending on size of ball)
glitter
bowls (to hold the glitter)
spoons (to spoon the glitter over the balls)
loose cover pins (for upholstery)
ribbons
old box


  • First, use your skewers/cocktail sticks to make holes in the box ready to take the balls once they've been glued and glittered. Allow enough room between them so that the balls won't touch each other (but if you miscalculate, don't worry too much, you can always angle them away from each other)
  • Next, skewer each of your balls ready to start painting the glue over them.
  • Now the messy part starts.  Cover your ball with pva glue.  Try not to put too much glue around the base of the skewer or it may prove difficult to extract the skewer - but you want to ensure good coverage once the glitter goes on.
  • Holding the skewer, you can now dip your sticky ball into the glitter.  I put mine in various dishes and found some worked better than others, eg ramekins were a little too small and glitter ended up going over the sides.  Round sides (eg pudding/mixing bowl) worked well as you can roll the balls in the glitter.  It is also useful to have a teaspoon to hand to spoon glitter over the bits you can't dip in or any bits that get missed.
  • Once the ball is completely covered in glitter, tap the skewer against the bowl to remove any loose glitter (I think you can do this quite hard as I still 'lost' a bit of glitter later in the process) and then push the skewer into your box to let the ball dry.  This should be at least overnight.

  • Next day, remove the skewered ball from the box and spray with hairspray to set the glitter.
  • Now you can embellish them.  After removing the skewer I pushed a loose cover pin (almost all the way in) over the skewer hole (just to make sure it is hidden - not all were that obvious though).  I found that the pins were too long for the smallest balls, so I had to trim them before pushing them into the balls.  Then thread a ribbon through the loop and tie (again - hiding the hole and the pin in one go).  Form a loop and tie a knot or bow - et voila, a lovely, glamourous Christmas bauble.  

And what's great is that they don't cost much - I already had a supply of balls, glue, ribbon and hairspray, so I only had to fork out for the glitter and pins which came to about £8 total (the pins were the bulk of this), and I've still got loads of glitter left for other projects

Sunday, 12 January 2014

Catching up on life - part 2

As promised, following my last post, I moved on to my hemming jobs and the remaining summer clothes have now finally been stored away until the better weather arrives.  But before I progress to something more adventurous, I came across some more darning jobs - yuck!

Hemmed trousers, repaired/
altered pj's and peg bag
While I was at it, I decided to repair a pair of pyjama bottoms and alter another that was a bit loose.  And hidden amongst the repair pile was a peg bag that I'd embroidered years ago, but still haven't got around to making up.  So this was the chance.  All I need now is to find a suitable wooden hanger to finish it off.  It is a shame that it is rather small, as my parents need a new one (the one I made for them donkey's years ago is literally coming apart at the seams) but there is no way all their pegs will fit in this one.  Instead I'll use this one and their current one as a pattern - one for size, the other for design and I have plenty of the pink sprig fabric left over too.

Feeling quite pleased with myself for finishing off these long awaited odd jobs, I gave myself a treat and made some Christmas decorations a la Kirsty Alsopp's Crafty Christmas.  I know it is way too early, but I was glad to have a use for the polystyrene balls I'd had hanging around for ages and something slightly different to what I'd used them for in the past.  I'll leave them to dry overnight then spray them with hairspray to fix all the glitter in place before embellishing them with ribbons for hanging.
My glitter balls as they dry

Friday, 10 January 2014

Skirting the issue

With our various home improvement schemes this year, it was inevitable that we'd have to go to Ikea at some point.  As we no longer have a car, I have three options for this.
  1. take a long, winding bus journey there and back
  2. wait until we need a hire car for other 'jobs' and combine the lot
  3. go with my parents when I visit the Land of Song
The cons of the above are:
  1. I'll spend more time on the bus than in Ikea and carrying bulky/heavy stuff back isn't ideal on public transport
  2. It may be a long wait until we can combine jobs that need transport
  3. I have to carry the stuff I buy back from LoS to London on public transport (see 1 above!)
However, needs must, so on a visit earlier this year, along with jars for food storage, hooks for tidying the cellar, etc, I also bought a couple of fleece blankets for crafting purposes.  I know it is easy enough to buy fleece fabric at a haberdashers, but they are so reasonable at Ikea you can't really go wrong.

The intention was to make Christmas tree skirts out of them.  So, I have 3 red ones, 2 white/cream ones, 1 green one and some off-cuts of pale blue and grey fleece.  Obviously, red, white and green are the colours of the LoS and conveniently also traditional Christmas colours, but blue, not so much.  However, the idea I had was to make a snowflake-themed one using the white and blue ones, with a bit of added silver sparkle in the form of silver thread, silver organza and/or some sequins/beads.  At some future date I may make a poinsettia one out of the red and white ones and/or make a Christmas bauble one on a green background using the off-cuts of the others and other vibrant fabrics.

I know, I know - how many tree skirts does a girl need?!?!  Well, I'm not intending to make them ALL for me - just two or three! ;-)  Naturally, I hope some are going to be Christmas presents!   However, plans didn't quite come to fruition for this Christmas.  With poorly parents I've only managed to make one 'prototype' skirt, but I am quite please with how it has turned out.  Here is my method:

Off-cuts ready for stitching/cutting
into snowflakes
Cutting out
Fold both the red and white fleeces in half, then in half again (so into four).  Using a make-shift compass out of some string and a dress-making pencil (or similar), fix one end of the string to the fold corner and the pencil to the other - then draw as big an arc (or quarter of a circle) as possible.  Cut out to create a large circle.  So, out of two fleeces I now have two circles large enough to be tree skirts.  The off-cuts will be used later.

Repeat the above method to draw a much smaller circle to make the hole for the tree trunk (or you could use a jar/mug/bottle as a template).  Cut out this smaller circle from the centre.

Using one of the folds as a guide, cut a straight line from the outer edge to the inner circle (this will be the opening).  If you wish (this may depend on the fabric you use), hem one of the straight edges - this will be the upper closing edge.

Next, the snowflakes:
  1. I tried three methods for the snowflakes, with varying success.  The first method was to trace the snowflake template directly onto the fleece and then sew the 'arms' with sparkly silver thread (I used Gutterman Sulky) along those lines by machine (quite easy - straight stitch in straight lines). And then trim around the stitching to get the 'classic' snowflake shape.  This method was fine, although not all the snowflakes were useable as the fleece stretched with sewing.
  2. The second method was to trace the templates onto some Wondaweb and iron them onto the off-cuts before stitching on the machine and trimming (as above).  This method was quite good for keeping the shape and for giving a clear shape to follow for cutting out.  But once it comes to removing the backing paper from the Wondaweb it all gets a bit fiddly to remove as the stitching keeps it in place rather well.
  3. Method 2 snowflake before cutting out
  4. The final method was to cut the snowflake out before stitching.  This way I was able to follow the traced lines to trim away the waste fabric and then peel away the backing paper with ease before ironing the snowflake into place, ready for the silver stitching.  
To be honest, if I were to make this again, I'd probably use this final method, although the second was fine and makes the snowflakes a little more sparkly as I stitched them twice.

There were two patterns of snowflake and the template offered three sizes.  I only used the two larger sizes for this project.


Lay out:
After making approximately 20-25 snowflakes I started laying them out to get the right 'look'.  Then I removed the backing paper and ironed them into place.  I'd never used Wondaweb before and I underestimated the 'ironing time' at this stage and quite a few snowflakes fell off before I stitched them into place (so the layout probably isn't as even as it could have been).  They were then stitched onto the red skirt.


Finishing:
To finish the tree skirt off and to continue the snow theme, I added some large white pom-pom trim to the outer edge.  I sewed this onto the underside (using red thread so that it didn't show) so that only the pom-poms show.  This was followed by sewing jumbo white ric-rac braid to both the outer edge and the inner.  To close the skirt once it is around the tree, you could sew some velcro along the straight edge, add buttons (self-covered?) and loops or use large press-studs (my option).

What do you think?  Are they worth doing again for this year's Christmas presents?


Friday, 18 January 2013

Getting some balls

I've been telling you all about the stash of craft supplies I have and that I think it is about time that some of it got used up.  Well, here is some of it!
Straw, template and cutter for making straw stars - German style
I tend to buy a lot of my 'stuff' on Ebay - there was a distinct lack of craft and haberdashery shops near me at the time.  And I admit that I've bought some bits when I've had a 'bright idea' about something and then it hasn't come to fruition (e.g. the key rings that I was going to make to sell for charity, but never found charts small enough that I liked).  Other items I've bought one or two of at somewhere like John Lewis when I've had an idea, like the polystyrene balls, and then liked the idea so much that I've bought lots (again on Ebay).  And once again, haven't actually used them all.

So, they are my next target.  I've no idea where I got the string idea from, but it is simple and effective.  Once again, they've adorned my Christmas tree and my parent's tree for years.  I do remember that I first made them when I was sharing a house in Walthamstow.  Anyway, as you can see I've added a bit of bling to the idea by using sequin string too.

I'm not sure how, but our cats got hold of one of the polystyrene balls and have been using it as a toy in our kitchen for over a year now.  As they seem to like them (they tend to make a bee-line for them on the Christmas tree) I think I'll treat them and make them their own string covered toy using jute string (again, another Ebay acquisition).  I even got adventurous and used two colours!


Friday, 11 January 2013

New commissions

Having got some Christmas stitching out of my system, it is now time to settle down to some serious stitching (and that doesn't include completing my curtain marathon!).

Over the Christmas holiday I got two new commissions - Yippee! 

The first is for a picture for my DN's bedroom - he's only 10 months old, so it is in the cute and cuddly vein.  His sister was given one by a friend when she was born, but as often happens with second/third ... children, he hasn't had one, so my SIL asked if I'd make him one.  He is such a sweetheart, I could hardly refuse, could I?

So, we've chosen a good old London Routemaster bus (for a good young London lad) full of cute little animals.  He's mad about vehicles already and has a similar print in his room and was given a lovely wooden London black cab for Christmas, so this should be perfect.  I must admit that I'm cheating a little but using a kit I found online here, but despite being fairly creative, drawing isn't exactly my strong point!

And my BIL (different side of the family!) has also asked me to stitch a poem for a friend to commemorate an award she received last summer.  The poem was written especially for the occasion and her name means 'snowdrop' in Welsh, and after a bit of hunting, I've found a nice Art Nouveau snowdrop border to go with it.  With a bit of luck mine will be flowering in the back garden as I stitch!  All I need now is to find a nice Art Nouveau font for the poem and I'll be ready to go.

I'll try to add some 'progress' photos (and of the snowdrops in the garden) here as I go along for you to keep an eye on things.

But for now, it's curtains for me if I don't get on with ours!!!
Week 1 progress
Week 2 progress - it is beginning to look like the back end of a bus!

Weeks 3 & 4 - almost half way there

Friday, 4 January 2013

Light relief

A couple of weeks ago I spent most of an afternoon and early evening crawling on the living room floor between layers of the curtain I'm sewing for the living room.  The cats were quite perplexed and thought it best to steer clear!

So, as a bit of light relief from that and the Christmas madness, I've been making some Christmas decorations.

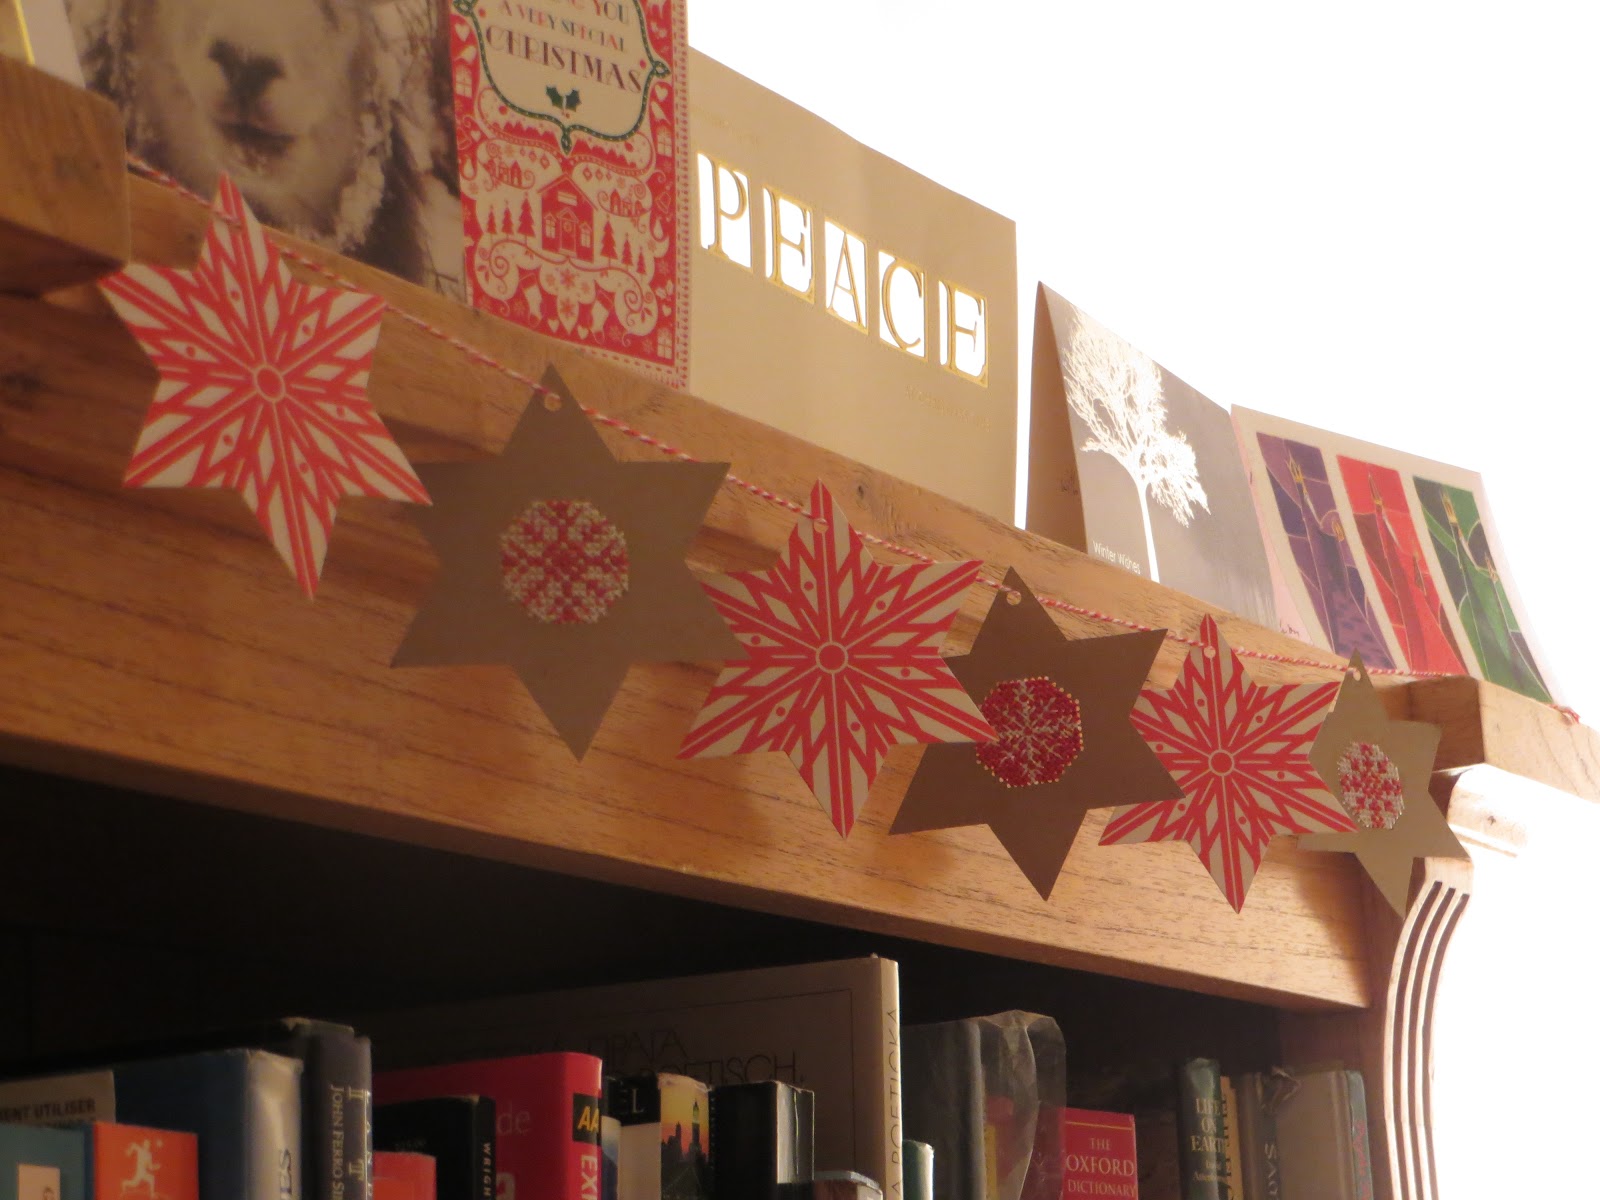
I rather like the magazine, Cross Stitcher, and although there are lots of designs I'm sure I'll never make, there are quite a few that I find quite tempting.  November's issue had a free gift - the materials to make a garland of stars/snowflakes.  In the pack were three red and white patterened card stars and three perforated card stars ready to embroider, red and white embroidery silks, red and white cord for stringing it all together and a needle.  According to the instructions, each star should take two hours to make, but I think I managed each one in a little over an hour.

Initially I intended to decorate our dresser with greenery, but as I didn't think I'd have the time to make a traditional garland, these seemed to be the perfect substitute.  However, I found some fairy lights for the dresser, so I've found somewhere else to hang these now.  They're very pretty and I really like the perforated card stars - although I tend to roll fabric around my fingers as I stitch so I had to be careful not to bend the card too much!  Unfortunately it doesn't seem possible to buy more of the perforated stars, but I've found instructions how to make your own. What do you think?


I'm so pleased with them I think I may try more of their Christmas designs.  I've gone back through old issues and found the free gifts and spent my quiet time over the Christmas break making them.  My DH is a bit confused why I'm making Christmas decorations when we'll be taking the tree down soon, but I'm enjoying myself. 
There are also some pretty Scandinavian inspired decorations in the December issue that may well fit some of the Framecraft accessories I've had from years (yes, more Ebay purchases!).

Wednesday, 2 January 2013

Christmas gifts

Well, for my first post of 2013, I can finally reveal what I made as presents for my family.

Pretty in a pinny! MIL's feminine confection.
His 'n' Hers
Big sis and BIL modelling the blue versions - the red ones were for my other BIL and SIL

Monday, 19 November 2012

The holidays are coming ...

Not that I usually quote adverts, but ...

Anyway, I've had rather a productive few days preparing for Christmas and thought I'd shout about it a bit.

I spent my birthday last week and some of the weekend happily sewing presents for various members of the family.  I promise to post some photos of them soon, but just in case any of them read this, I don't want to spoil the surprise.  Although I could be tempted to post some cryptic shots so as not to disappoint the rest of you - so watch this space!


So, along with some shopping DH and I did at an eisteddfod over the summer, we have 7 presents sorted and 'only' 5 family members to go (and we've a few ideas for some of those) and nearly all of DH's god-children's and our foreign friends' presents have been bought too.  So that is the bulk of the Holiday Headache cleared.

And to add to the festive excitement, a robin decided to visit my DS's kitchen last week and wasn't keen on leaving before they all left for school/work!

Don't you think that deserves a glass of mulled wine?!

Tuesday, 13 November 2012

Pretty in a Pinny

Well hello - it is nice to be back with you all!  Please accept my apologies for my long absence.  It has been rather a hectic time since my last post, but we're finally getting straight again (and de-stressing in the process!).  And my, what a difference it has made already.  The ground floor is already much warmer and cosier.   The new windows are lovely and we planted ALL the bulbs (with a little lot of help from my parents).  Unfortunately, I didn't quite manage to finish the painting jobs as I'd hoped, but that will all be done next week, along with new curtain poles in three rooms (made by my lovely friend, Nia).

Right, back to the business in hand.

You may recall that back in February I mentioned some lovely craft/sewing books I'd acquired and that MIL requested that I make her an apron from one of them as her Christmas present.

Well, that time has come and I really need to get on with it before larger projects get in the way (eg living room curtains).

The book in question is the Liberty Book of Home Sewing and it is full of gorgeously, tempting projects to wear around the home and for the home.  My lovely MIL is a very keen cook, so an apron is just the thing for her, although I suspect that this one (as seen on Katherine Hannaford's Double Exposure blog - I'm dying to know if she managed to make every project in the book!) won't be her 'working' one, but more for show!

Having browsed through the book again (and drooled!) and chosen fabrics for MIL's gift (more drooling), I also got thinking about other projects in the book that would be fun to make and am now seriously considering some others as Christmas presents and possible additions to our home.  I'll keep you posted on how I get on with these soon.

Thursday, 6 September 2012

Lists

It's that time of year again.  Summer holidays over and everyone thinking of the 'new year'.  A depressing thought?

Well, not for DH apparently.  He finds it quite exciting (he likes plans!).  As a result, we spent some of the bank holiday weekend planning our autumn ... and that comprised of creating a number of lists!

A list of people we want to see
A list of things we want to do
A list of jobs to organise
A list of jobs in the garden
A list of jobs in the house ...

The list of lists goes on ...

Naturally, in the middle of all these lists, there is a list of projects for me to sew (with one or two extras by me that aren't part of the above listed lists!).   So, here it is (in no particular order) for you to help keep me on track (and check up on me!):
  • Tidy kitchen blinds (I know, I made these months ago and still haven't tidied the odds and ends up!)  Hooray, I finally finished them! And I've now also altered them to fit the new windows - happy me!
  • Replace spare bedroom curtain linings (thoughtfully shredded by sunlight and cats) - one down, one to go!  Almost there now, just need to finish the pleating and rehang :-)
  • Buy living/dining room curtain fabric (a warning - there will be miles of this when I get it as the windows are ridiculously tall) and allow some extra fabric for matching/coordinating cushions
  • Make up living/dining room curtains (is there such a thing as a 'life saver' to prevent you drowning in fabric?!) - see above re cushion covers too.  Hooray - finished sewing them, just need to finish hemming them now!
  • make new white blouse/tunic for self using Amy Butler Liverpool pattern (as a test piece for making a patterned one for DM and me)
  • make apron for MIL from Liberty book I had for Christmas last year (in time for Christmas this year)
  • Make bread basket and tea cosy for kitchen out of left over blind fabric
  • Start designing anniversary sampler for DS (significant anniversary not for 23 months, so I have a little time!)
  • Start designing bicentenary sampler for church (not sure I'll make it for the bicentenary, but certainly to mark it)
  • Make/embroider some Christmas decorations as gifts for this Christmas (or maybe just sew some Christmas gifts)
  • Order fabric for bedroom curtains (once pole is in place) and make up, also cushion for chaise longue and throw and cushion for bed
  • Cover lampshade for bedroom (if we still can't find one we like and can afford!)  We found a lovely one in the Grand Bazaar in Instanbul
OK, let's be honest.  This list is likely to keep me out of mischief until well into 2013 and beyond, but we can but hope!

PS:  I'll try to remember to strike through those I manage to finish as I go along.

Wednesday, 22 February 2012

Pandora's box?

Christmas 2010  - I was hit by (mild) panic a couple of days before The Big Day when we realised that my parents (who were coming to us for Christmas) had left home without our Christmas present for my mother in law (which they were to collect from the picture framers)!

Next stop - v. nice toilettry shop to buy 'substitute' Christmas present.

Quite fortunately this went down very well and also came in a lovely gift box with a gorgeous velvet ribbon bow to boot.

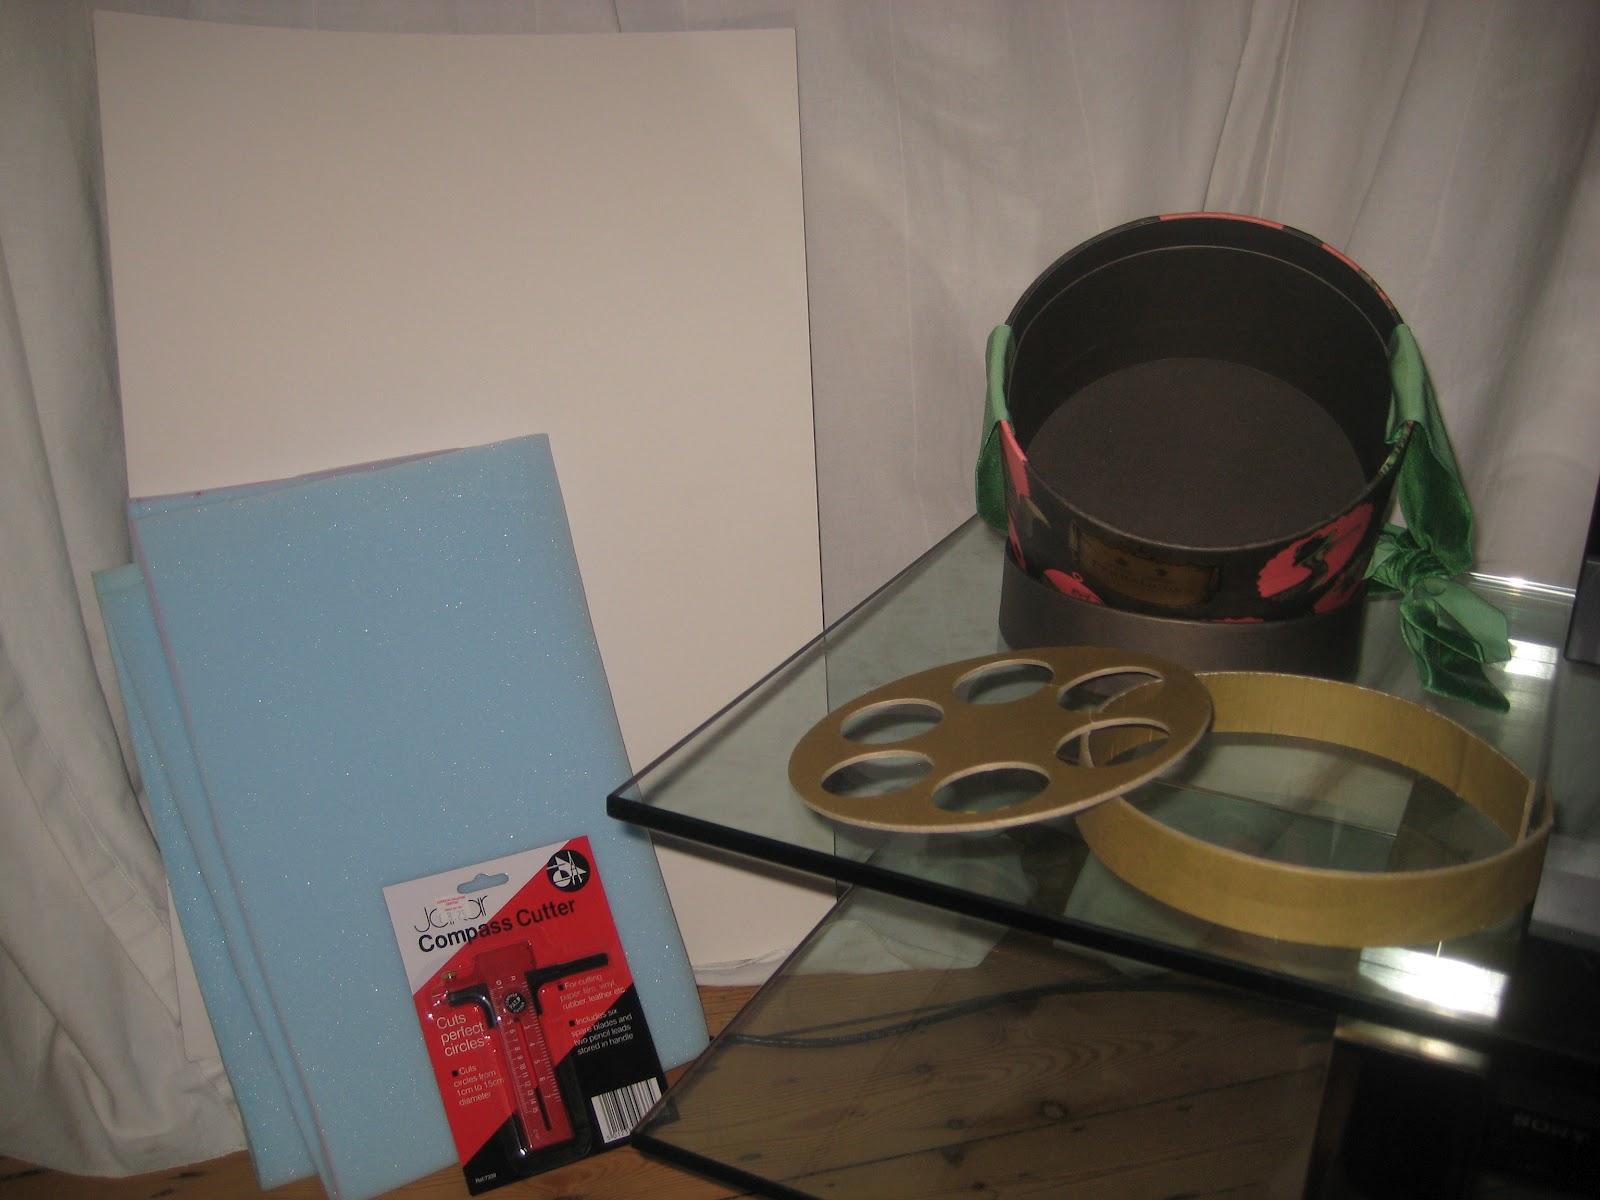
So, this year it's time for me to 'convert' the gift box into a jewellery box for my mother in law.  Now, I've never done anything like this before, but I'm pretty good with diy/handy stuff, so I've a vague idea how I'm going to do it.

However, it would all be so easy if the box was square or rectangluar, but no! it is circular!

Quite handily, it came with some 'innards' that I'm hoping to convert into a pull out tray (what have I let myself in for?!) and I've got some (thin) upholstery foam from Ebay to give some padding.  All I need now is some more thick card, velvet to match/coordinate with the box exterior and some time and patience to put it all together!


Wish me luck!

Tuesday, 24 January 2012

You have to star-t somewhere!

The new year is always awash with resolutions and good intentions isn't it?  And mine this year (or at least one of them) is to be more creative.
I've been embroidering, sewing, making things on and off for years now and before Christmas, after finishing five roman blinds for our 'new' kitchen, I really felt that I wanted to keep going now that I'd got back into the swing of things.  And this blog is an attempt to encourage myself to keep the momentum going.  So, please bear with me as I get the hang of blogging
Rewinding a little, with less than a week to go before Christmas, I rummaged through my stuff (and I've accumulated a LOT of craft odds and ends) and decided to make some decorations.  A bit late, maybe, but I could always keep them until next year as gifts.
And I settled on stars.  Beads stars to be precise.


Here's my 'kit'.
As you can see, I also started some sequined baubles.  These are based on some string covered ones I made years ago (I'll try to put some photos of those here too sometime), but a bit more 'bling'.  Unfortunately, my sequins ran out, so I'll have to get back on Ebay to buy more before I can finish them off.
Right, back to my bead stars.  I first saw them when a very dear German friend gave me some.  She had such a talent for wrapping gifts and every Christmas our delivery from her would be a delight even before we'd opened the presents.  And more often than not, on top of the selection of parcels she'd sent us would be a branch of Christmas tree with a beautiful, traditional German decoration.  Some would be straw stars, others would be painted pewter, or wax ... or these simple, but delightful wooden bead stars.


She promised that she'd show me how to make them, but the only 'tuition' I got was a star and 'I'm sure you can work it out for yourself!'.  So, I gave it a go and here's the result.  I've made dozens and dozens.  They adorn my parent's Christmas tree, my sister's tree and mine.  I've also used them to decorate Christmas presents too - looping the ribbon bow through the hole, or just fastening them to the gift ribbon.  I'm sure you could think of other things to do with them too.  I also made some blue and white ones for a Jewish friend, as they are a Star of David.