Monday, 29 April 2013

Divertimenti

What is it about me?  I've plenty of projects to be getting on with and tick off my (long) to-do list, but instead I get distracted and start something new.

I should be finishing of DNw's bus sampler, but I've come to the conclusion that I don't like doing french knots on Aida fabric, so I'm jibbing and trying to delay the inevitable.

I could also be making the dining room curtains to match the gigantic ones in the living room (thankfully, the window there is a LOT narrower!), but I've only managed to do one layer of them so far.

Instead I entertained myself on a rather dull train journey last week by making a key ring (free gift in my favourite cross-stitching magazine).  Then I made a birthday card for SIL whilst watching a couple of hours of BBC4 one evening and now I'm working on a wedding card for some friends who are getting married at the weekend.


Tuesday, 23 April 2013

Pretty in a pinny - part 2

I've had another request for my sewing 'talents'.  Do you remember this post about the apron I made for my MIL? 

The original pinny
Well, she's requested an improvement to it.  She's quite petite, so to be honest, a pinny to cover just her skirt isn't all that practical.  So my new 'commission' is to add a 'bib' to it.

Thankfully I've enough of the original fabric left that it was a fairly quick task.  I thought about repeating the frill on the bib somewhere, but decided it would be a bit OTT.  I opted for KISS instead (kept it simple, stupid - for anyone who's unsure) and just added a square-ish 'bib' in the same fabric as the body of the original apron and used the contrasting fabric (like the frill) to make a neck band/tie.  But I thought that was a bit unimaginative and it is quite a feminine apron and fabric.

Then, whilst doing something completely different, I came across Amy Butler's apron pattern and thought a version of the 'bib' part might work quite nicely (and DH agreed).  So in true 'Great British Sewing Bee' fashion, I draped and pinned and tucked and repinned .... until I came up with something vaguely like I wanted.  Just to be sure (as I'm not all that experienced in draping etc) I cut out the lining first from one of DH's old shirts and redid the draping, pinning thing again.  And once I was happy with that, I cut a matching piece out of the 'paisley' fabric and edged the curved 'neckline' with the fine print (as above) and also added edging along the sides that become the ties around the back of the neck.  I just hope it doesn't look too 'added on'.
A rather tired and mad looking 'yours truly' modelling
the new look apron after a long choir rehearsal

Wednesday, 17 April 2013

Revamping my 'craft' room

For years I have dreamt of having a dedicated sewing/craft room, but it hasn't materialised.  Mainly because in the past I haven't had the space.  So my sewing gear etc has been stashed in wardrobes, cupboards, bookshelves, trunks ... and invariably moved around as the space demanded.

Now we have a lovely spacious house, but still I haven't had a dedicated room and again my sewing stuff has been spread over various parts of the house - attic, cellar, spare room, living room cupboard, trunk and various bags.  However, we've had a spare room that has become a bit of a dumping ground as it hasn't a specific use and this has been annoying us both.  It has become home to the books that don't fit onto the shelves in the living room, our spare desk, our (now) disused filing cabinet, items I intend to sell on Ebay or similar, my German teaching supplies, photo albums (again, that don't fit on the living room shelves), and some of my craft gear.

Recently I've been using the room a lot more as my sewing room (for my humungous task of the largest curtains in Britain) and, well, frankly, I've had enough of the shambles.  It is high time that the room had some sort of function and 'prettified' (and that we tidied things up a bit more!). So, over a couple of weekends, and with a bit of help from DM and DF and a sneaky trip to Ikea, it has changed from this...


I know - a mess or what?
to this ....

A nice cosy sewing or reading corner
A dedicated sewing space that can be turned at right
angles to the wall for bigger projects.
The perfect 'door plate' for my new-look room
It is still a bit more tidying to do and it is still a little bare and spartan, but adorning the top of the cupboard with some of my travel souvenirs and adding a couple of shelves in the alcove above the trunk has freed up space on the bookshelves (which have had yet another temporary reprieve!  Not my favourite of DH's contributions to our household), so they a) look tidier and more attractive and b) provide space for stuff that has been cluttering up other spaces.  I've also been able to display a few more of my works on the walls too.

One day we might add a rug and change the curtains, but for now, at least it's a step in the right direction!

Sunday, 14 April 2013

Snowdrops

At the beginning of the year I told you about commissions I'd received.  I must admit that it has taken me longer than I expected to finish the first.  Well, I've finally started work on the second.

It is an embroidery of a poem written especially for a friend of my BIL's when she was presented with a special award at the Welsh National Eisteddfod.  Her name means 'snowdrop' in Welsh, so he's requested a snowdrop border for it.

After much searching in books and online, I finally fell for this Art Nouveau one from this book.
My needlework book collection - well, some of it!
And for those of you who aren't very familiar with plotting cross stitch charts, this is the process I followed:

After choosing a font I liked, I plotted the words of the poem on grid paper.  Once I'd finished that, I worked out the centre of the poem (dividing the number of squares the width of the words takes by 2 and ditto with the height of the words) and marked that on the chart.

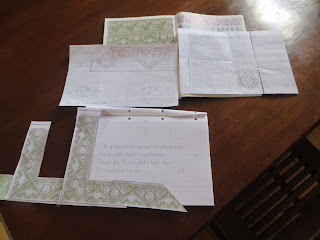
I photocopied the chart of the border a number of times and played around with them to get the best option for turning corners (IMHO, of course).  I also decided which part of the design worked best at the 'centre' so that I could line this up with the centre of the words.

Photocopies of the border used to try out different 'corner' options (with plotted poem)
With all of this decided, I copied the border (as the photocopies weren't on the same scale as my chart for the poem - bad planning on my part and I expect there would be a way of photocopying to the correct scale or choosing the correct scale grid paper for plotting!) to work out the scale in relation to the poem.  I then 'played' around a bit with the border in relation to the words to work out how many times the motif would fit across and up the poem in order that I could try to work out how much space there would be around the words.  Being totally honest, I had got quite confused by this point was loosing interest in it all.  I ended up 'guess-timating' 3 motifs across and 2 up, plus the corner and came up with 3 full plus two 'halves' along the top and bottom; 2 full plus two 'halves' up each side.  If you're still following - congratulations and stick with me a bit longer.  If not, I hope some photos will help clarify things a little.
Up-scaled border motif with poem
My bits of plotting, calculations and jottings
To cut a long-ish story short, with all those calculations done I realised that I needed to find a larger font for the poem as there would be far too much 'white' space around it otherwise!

Anyhow, with all of this done (phew, time for a well-deserved cuppa and biscuit I think - for you and me!) it was time to work out how much fabric I needed.  Thankfully you can find help with this online like this for example.

I've decided to go with an evenweave fabric as a) I prefer it, b) I think it will suit the style of the border better and c) I think the recipient will like it and it will suit her decor (from what I know of her).

As for the colours, well, for once, that was a little easier to decide on than the rest.  Firstly, snowdrops are white and green - easy.  And secondly, the lady in question leads a dance group and the group's signature colour is purple.  So, the border in white and green and the poem in purple (which thankfully goes quite well with green and white - lucky that!) on a natural linen background (so that the white of the snowdrops shows up nicely).

So, off I go .....

Sunday, 7 April 2013

Blood, sweat and tears

Well, at long last, finally, o'r diwedd, endlich, enfin ...

... we have a PAIR of curtains in the living room.

Yes, you did read that correctly - A PAIR, two, one at either side of the window, at each end of the curtain pole.

Can you believe it?!  I barely can, to be honest!

And WHAT a relief.  I was beginning to think that I'd never get there and I'd been a complete idiot even contemplating making such ENORMOUS curtains single-handedly.

To be honest though, it wasn't single-handed.  Without DF and DH's help with the calculations for the pleats and DH's help with laying the second one out and measuring three times (yes, THREE times), I was VERY close to throwing in the towel (or should I say curtain).

Admittedly, I still have to hem about 10 miles of curtains (I've already used a kilometre of sewing thread - literally!) and buy some weights for the hems.  And I haven't even started on the matching dining room pair (which are at least a fraction of the width of these monsters).


But I'm thrilled to bits that both are now up.

We almost had a "disaaaaaaster" (to quote Craig Revel Horwood) when I was trying to move an extra ring to the other side of the bracket after both curtains were up.  Diolch, thank you, merci, danke to DH for his patience, soothing words, muscle and spare pair of hands to a) hold the weight of the curtain and b) pick up all the bits I dropped in my panic.

And to explain the title of this post;
blood - I've stabbed my fingers so often making these curtains that I have literally bled my way through the process (and there has been the odd stain on the fabric too - hopefully all now hidden within pleats where it didn't all come off)
sweat - trying to man-handle that much fabric to hang so high up is brilliant aerobic exercise!
tears - well, there weren't any, but they were VERY close on a number of occasions.

Oh, and sorry for all the italics, capitals, exclamation marks etc!!!!!

Now, where is that champagne?

Thursday, 4 April 2013

Spring headbands

We've just had a lovely Easter weekend with my PIL and DH's family.  It was a bit of a shame that the weather is STILL nothing like spring, but at least we saw some sunshine.

Our little DNc and DNw were there too, charming us all and providing fabulous entertainment all weekend. But two and half year-old DNc's hair, like most toddler's hair, is fine and fly-away and now that it is a bit longer, was constantly in her eyes and her alice bands and clips just weren't staying put.  So after we got home, out came my stash of ribbons and SIL chose a few she liked and whilst I was watching Broadchurch on Easter Monday

I made some elasticated headbands for DNc.  I hope they'll fit.

Here is the method (which is more or less what I'd thought up myself but simpler and actually thanks to a Martha Stewart video I found online).
Materials (essential):
ribbon
elastic
needle
cotton/thread
scissors
tape measure
(optional)
buttons, bows, charms, beads, other embellishments
  1. Measure your head (roughly where you'd wear a headband).  I usually work in centimetres, but this time I worked in inches just because it was a nice round figure.  So, my example was 20 inches.
  2. Deduct a small amount, in my case I deducted 2 inches, to allow for a bit of give so the band will 'grip'.
  3. Deduct another small amount - this is to split the measurement between the ribbon and the elastic.  I went for 15 inches and 3 inches, which will give me an 18 inch headband to fit a 20 inch head.
  4. I cut my ribbon to 16 inches (to allow a generous half inch at either end to neaten the ends) and 3.5 inches of elastic. 
  5. Turn up approximately 0.5 inch at one end of your ribbon.  Centre one end of the elastic on it, so that it looks a bit like this ....
  6. Stitch elastic to ribbon to secure in place.  Fold sides of ribbon over and sew ribbon edges together, so it looks a bit like this .....
  7. Repeat steps 5 and 6 with the other ends of the ribbon and elastic (take care to ensure that neither the elastic nor the ribbon has twists in it)
  8. (optional step) add embellishments, such as bow, rosette, button ....
  9. Et voila, a pretty, cheap, easy and unique headband for yourself, a friend or a child.  And as Martha says in her video, it is a nice project to do in company and chat whilst doing it (although DH and Broadchurch were my 'company', the conversation wasn't flowing all that much).